Designing & Building an LCD MAME Cabinet
The Plan for an LCD MAME Cabinet
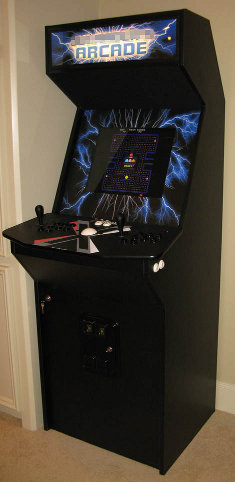 |
| Finished MAME Cabinet |
I also decided that I didn't want to build my own controller setup. I have the tools and know-how to do it, but I had seen the X-Arcade Tankstick + Trackball and I really liked how it looked and with the trackball and the two joysticks, I knew it would work with the majority of the games I wanted to play. I have seen other people use this controller, but they hadn't truly integrated it into the cabinet. It was either sitting on top or in a pocket of the cabinet. If I were to use this controller, I wanted it to look like it was an intrinsic part of the cabinet.
I searched the Internet high and low for designs or plans that utilized an LCD monitor and just couldn't find anything to help me. I decided to design my own cabinet.
I started by laying out a long sheet of butcher/freezer paper and began to measure out my pattern for the profile of the cabinet. Once I finalized my plan, I cut out the pattern.
I have created two full-size patterns in pdf format. One has dimensions and one does not. Although it's unlikely that many people have the option for printing the pattern full-size, I thought I would create it in this format just in case. If you can't print it full-size, it should be fairly easy to lay out some butcher or wrapping paper (or directly on your wood) and measure and draw your own pattern from the dimensioned version I have created. Click here for the LCD MAME cabinet plans with dimensions or here for the LCD MAME cabinet plans without dimensions
Creating the cabinet sides
I considered using MDF (particle board) for the cabinet, but compared to plywood, I find MDF to be heavy, not as strong and more susceptible to breakage.
 |
| Cutting Cabinet Sides Using Guide |
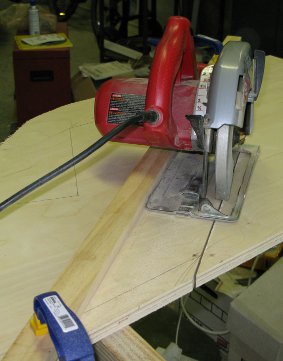
After tracing the pattern on a sheet of plywood, I prepared to cut the wood. I had considered using a jig saw, but I've noticed that mine doesn't cut a perfectly straight line, even when using a guide for the saw. The blade has a tendency to start wandering and cut uneven lines. Instead, I chose to use a circular saw for the long straight cuts and the jig saw or a hand saw to finish cuts on internal angles that the circular saw couldn't finish.
As you can see in the picture, I clamped down a board as a guide. This helped the circular saw cut very straight lines. Since I cut the two cabinet sides separately, I wanted them to be as straight and as closely matched to each other as possible.
After cutting out both sides of the cabinet, I clamped them together for sanding. It's important that both sides are exactly the same size and shape so the cabinet looks nice and fits together perfectly square. I used a palm sander to quickly sand the edges so both sides were identical.